

Procreate on iPad isn’t simply straightforward to make use of, it’s been crafted for artists, by artists. With silky-smooth Apple Pencil help, intuitive gesture controls, and the type of real-time responsiveness that desktop apps can solely dream of, this pocket-sized powerhouse is extra than simply among the best drawing apps on iPad.That can assist you get probably the most out of Procreate’s instruments and workflows, we’ve teamed up with recreation artist Antony Ward (through our mates at ImagineFX) to unlock 10 secret Procreate ideas and methods that everybody could make use of. From utilizing reference photos to simply harmonising and setting color palettes, these Procreate hacks are designed to raise your artwork.Whether or not you are fine-tuning your portraits, stylising your characters, or simply seeking to break by way of artistic blocks, the following pointers will remodel the way in which you’re employed in Procreate. Need extra methods to push your digital portray additional? Take a look at our Procreate surroundings portray ideas and discover our curated record of Procreate tutorials to stage up each space of your artwork.
You could like
1. Procreate Widget
(Picture: © Antony Ward)
An often-overlooked choice is the flexibility so as to add a Procreate widget to your iPad residence display slightly than the usual icon. The primary profit is that it permits you to immediately soar into your present mission so you possibly can proceed working. One other benefit is that it additionally allows you to shortly exhibit a few of your artwork. As with every iPad widget, there are alternatives to regulate its measurement, form, and place in your most popular format.
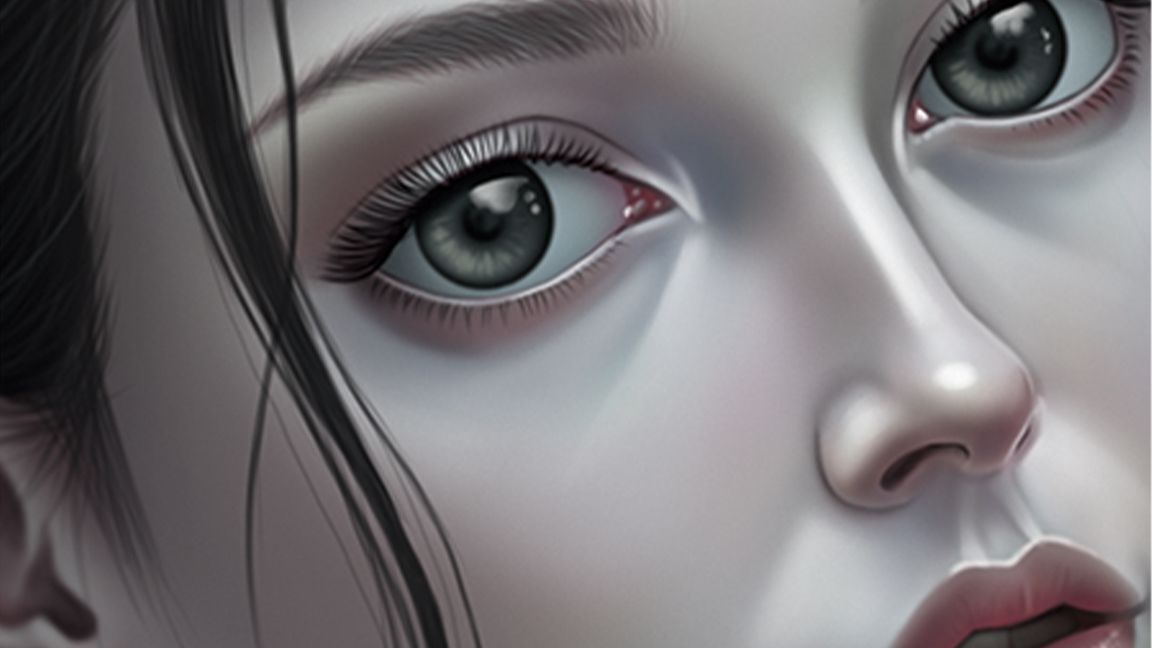
2. Use Reference Photographs and layers
(Picture: © Anthony Ward)
When you’ve ever wanted the choice of a second reference window slightly than utilizing the iPad’s cut up display, which isn’t ideally suited, Procreate has acquired your again. Go to Actions>Canvas and also you’ll see a Reference choice. When enabled, this offers you a brand new floating window that you may transfer round and scale. You have got just a few choices with regard to what the window shows: you should utilize it to indicate the present canvas, add a reference picture, or use your face as a reference.Right here’s one other reference trick! Everyone knows you possibly can shortly fill an space of your work by dragging the color dropper into it, however the issue when working with line-art is that you find yourself with the crammed color on the identical layer, making it troublesome to edit it later. An alternative choice is to set the road artwork layer to Reference. This may allow you to shortly fill areas on a separate layer beneath in order that they’re saved aside and simply edited later.
3. Instantaneous Color Palette
(Picture: © Anthony Ward)
Fairly than attempting to choose colors from a photograph to make use of in your work, let Procreate discover the dominant shades and generate a palette for you. To do that, open up the Coloration Panel and head to the Palettes tab. Now press the ‘+’ icon within the high nook and also you’ll be given an choice to generate a brand new palette utilizing the digicam, a file, or a photograph out of your library.
4. Non-public Photographs
(Picture: © Anthony Ward)
When producing a timelapse video of your work, usually, all the things that occurs in your Procreate canvas is recorded. Generally it’s possible you’ll want sure layers to be hidden, although, like a reference picture or a brief sketch. In Procreate, you could have the choice to import photos as Non-public Photographs, which creates a brand new layer that’s invisible to any timelapse recordings. So as to add one, go to Add after which Insert Picture, however swipe it left to disclose the ‘Insert a non-public picture’ choice.
5. Color Concord
(Picture: © Anthony Ward)
Color idea performs an enormous function in artwork, and that is one thing Procreate’s builders are properly conscious of, in order that they constructed instruments to assist. When you open the Coloration Panel, you’ll see a Concord choice alongside the underside. Selecting this may open the dial and present you the complementary color associated to what you’ve chosen. And when you click on the Colours title, you’ll see a complete vary of choices out there.
6. Take away Fill Traces in Line-Artwork
(Picture: © Anthony Ward)
Dragging a Coloration Swatch onto the canvas is a fast and straightforward approach to fill an space, however generally the fill doesn’t fairly go all the way in which, leaving a faint white line simply exterior the radius. To fight this, all it’s essential to do is maintain the pencil, or your finger, held down, and also you’ll see a Threshold bar seem throughout the highest of the UI. Now you can drag to the correct to extend this Threshold and get rid of your line.
7. Transfer the Brush Bar
(Picture: © Anthony Ward)
Do you know that the Brush Measurement and Opacity bar may be moved? Firstly, there’s the ‘Proper-hand interface’ choice within the Prefs tab, which can mirror the bar to the alternative facet of the canvas. That’s nice, however you may also change its vertical place. Swipe in from exterior the display, and the bar will transfer out. Preserve holding it, and you’ll transfer up and down to regulate the place.
8. Venture Canvas
(Picture: © Anthony Ward)
Utilizing the reference window is a good way to shortly see your canvas when you deal with a selected space, however the iPad display isn’t big, so the canvas can generally really feel cramped as you do that. An alternative choice, when you’ve got a spare monitor, is to mission your canvas onto it as you’re employed. Join the iPad to the monitor to do that, which can merely mirror the iPad display initially. Now go to Prefs and allow Venture Canvas. The canvas will probably be displayed however stay mounted, so it received’t present you shifting and zooming into it as you’re employed. That is additionally nice when you’re giving demonstrations.
9. Discover Layers Shortly
(Picture: © Anthony Ward)
Whereas engaged on a bit of artwork, your layer administration will inevitably exit of the window until you prefer to organise and identify your layers as you go. Even nonetheless, when you could have loads, it may be troublesome to shortly discover the one you want. Procreate has a neat choice that allows you to maintain a finger on the display, and it’ll routinely choose the layer you need by detecting the pixels beneath. To allow this, go to Actions>Prefs>Gesture Controls. Select Layer Choose and allow ‘Faucet and Maintain’. It’s also possible to modify the delay wanted earlier than it’s triggered.
10. Smudge together with your finger
(Picture: © Anthony Ward)
When you’re extra of a conventional artist who’s used to chalk, charcoal, or possibly even pencil, you’ll steadily use your fingers to shortly smudge your work for mixing. There’s an choice in Procreate to get the same impact! Return to Gesture Controls, however this time select the Smudge choice. Merely allow Contact on the high, and now you can smudge the display together with your finger.