

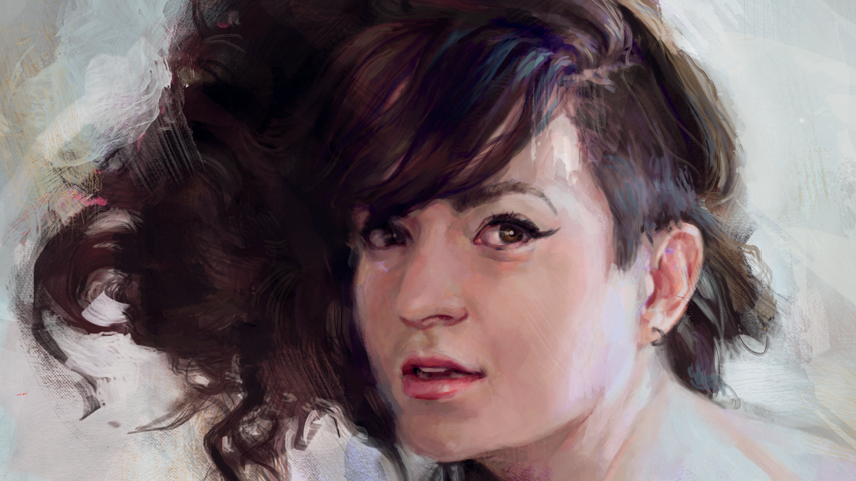
On this tutorial, I will present you how you can paint a portrait in Photoshop that captures the viewer’s consideration. I am working from a reference of Cassandra, whose putting darkish hair contrasts superbly with the muted tones of her pores and skin.I used to be drawn to the refined mixture of heat and funky mild on her face and the nice and cozy glow set in opposition to a cool background. Her pose of trying again over her shoulder, provides a candid, pure really feel that offers the picture quiet emotion.Earlier than I begin portray, I establish what stands out to me: the lighting, color and expression. This helps information my choices as I work. Whereas digital portray will be very managed, I deliberately invite “glad accidents”, misplaced edges, sudden textures and color surprises, to maintain the picture energetic and stuffed with character.
You might like
I like working in Photoshop, however you might use one other program from our choose of the most effective digital artwork software program. You may also wish to see our information to the most effective drawing tablets.
01. The topic
Good reference is the inspiration in your portray. I arrange a photoshoot with Cassandra at a time when numerous pure mild is available in by means of the home windows. This creates a gorgeous gentle distinction between the indoor heat lights and a brilliant bleached daylight. Within the picture that I selected for this portrait, her again and hair present framing for the face, which leads the attention in a spiral across the portrait.
02. Color palette
With the intention to get the fundamental shapes down rapidly, I put together a palette to color choose from. On this case, I’m enchanted with the lighting and I wish to keep near it. If I color choose proper from the picture, the grain and noise get in the way in which, so I take advantage of just a little digital cheat: making use of Photoshop’s cutout filter to simplify the picture into flat colors (Filter>Inventive>Cutout). This primary palette is an effective leaping off level, and I can add extra colors later.
03: Squint
It’s tempting to get caught up within the nuances of the eyes, or the feel of It’s tempting to get caught up within the nuances of the eyes, or the feel of the hair, however these are finest reserved for later. Construct from easy to complicated. To see the fundamental shapes squint on the picture so the main points are fuzzy. This exhibits an important data – should you can’t see it, it’s not important for preliminary construction.You possibly can do this train to see how our eyes work: With out refocusing your eyes attempt to discover particulars about your arm. It’s really fairly blurry! Our eyes can solely focus utterly on a small space of imaginative and prescient shut by. By selecting a focus in your portrait and steadily dropping element away from it, you assist the phantasm that the topic is correct there in entrance of the viewer. If you’re portray from life, focus in your focus and use peripheral imaginative and prescient to see the remainder of the scene. Working from {a photograph}, all the things is in focus, so it’s important to invent this impact.
04: Fundamental shapes
This Blocking within the primary shapes is an important a part of the portray. This lays the inspiration for all the things to come back – the proportions, likeness, mild and kind are all arrange right here within the first easy strokes. I take advantage of a big brush for my first go, which prevents me from getting caught up within the particulars.
05: Facial options
After I’m glad that the fundamental shapes are in place, I start to work on smaller areas of the portray. The temptation is to make use of onerous traces to outline the perimeters of every characteristic, however a lot of the edges needs to be gentle to point out that the volumes flip steadily in house. As I add the options, I’m cautious to not be too darkish or outlined too rapidly. I zoom out typically so I can see the connection between the options.
06: Focus
When deciding a composition there needs to be one focus designed to draw the viewer’s consideration. For portraits, it’s typically a single eye. Happy with the fundamental placement of my options, I add extra refinement in my focus – the appropriate eye. By beginning my rendering with the focus, I can all the time examine in opposition to it and make certain that the remainder of the portray shouldn’t be competing for consideration.
07. Work outwards from the focus
Now that I’ve added particulars to the focus of the portray, I can begin refining the remainder of the portrait. I start to work outwards from the attention. As I work additional away from this level, I take advantage of softer edges and fewer distinction. I’ve deliberate that the big space of her again will probably be largely misplaced into brilliant mild, so I don’t want so as to add any particulars there. As I transfer across the canvas including refinement, I do it on a number of new layers so, if I have to, I can all the time get again to the fundamental construction I used to be glad with.
08. Defining planes
Whereas rendering particulars, I think about every space as a easy development of planes – prefer it’s chiselled out of wooden. Quantity or depth is mild falling on three-dimensional kind. The place the shape turns to face away from the sunshine supply, it turns into shaded. Conserving the construction in thoughts helps me to know how the shading works, quite than simply copying its placement.
09. Portray within the hand element
Arms are virtually as private as faces, and the gesture of this one actually provides to the candid feeling of the piece. I don’t wish to emphasize it an excessive amount of, nonetheless. The hand is a supporting component within the portray. I paint from joint to joint, searching for the bends within the fingers and separating them with values, once more following the aircraft adjustments. The skin edges will be left just a little fuzzy in order that the hand doesn’t stand out or really feel caught on to the background.
10: Carry life to the background
The background wants exercise, and a few touches of color to convey it along with the determine. For this, I take advantage of high-res paint texture brushes to rapidly fill within the house with summary particulars. I choose colors from the portray and layer them beneath the feel, maintaining in thoughts that the general tone needs to be cool and the worth a bit darker than the brightest mild on her pores and skin so she’s going to come out.
11. Tweak layers
Even with all the color and texture within the background, I really feel it’s a bit sterile. I take a snapshot and begin experimenting – hiding it beneath portray layers, and attempting out varied mixing modes. Altering earlier layers can result in attention-grabbing, sudden results, with the main points painted later nonetheless intact. I regulate ranges on a number of of the layers to present extra distinction to the pores and skin tones.
12. Tender shapes for hair
Happy with the glad accidents from experimenting with the layers, it’s time to work on the hair. For a giant mess of textured hair like this, the hot button is to construct from gentle edges. I take advantage of a gentle spherical airbrush, particularly specializing in the surface fringe of the hair form the place I wish to present that the strands turn out to be much less dense than within the centre.
13: Strands
As soon as the primary form of the hair is in, I add texture and lighting. The feel of this darkish hair largely exhibits up within the spotlight areas, so I deal with these. It’s unattainable to color each strand of hair, so I squint once more to see the massive adjustments in worth and color and paint these in first. A number of very high quality strokes added final give the sense of strands.
14: Layer choices
Considered one of my favorite digital methods is to make use of a texture together with a low opacity or one of many layer mix modes, in order that the picture exhibits by means of. It provides a way of element with out really portray in particulars. For this, I take advantage of paint texture brushes once more. I’m not too cautious with the place they fall – letting a number of the background spill over the determine makes her really feel built-in within the house. This layer will get set to Overlay, a layer mode that makes darks darker and lights lighter.
15: Taking part in round
If it have been a pastel portray I’d cease now. As an alternative I save and resolve to maintain tweaking ranges and Hue/Saturation for the assorted layers, and messing with the shapes within the background. This is a bonus of digital: I can all the time return, so there isn’t a purpose to not experiment. Now I shut the reference so I can deal with the portray and cease fascinated by capturing the picture.
16: New file
Now that I’ve accomplished all the things I can tweak the layered picture. I take advantage of the duplicate file button within the historical past menu to make a replica, and merge down the entire layers in that duplicate. I’m all the time cautious to not merge the layers on the unique. Duplicating first lets you return and make adjustments within the layered picture if wanted.
17: Closing touches
On the newly merged file, I darken and lighten the values a bit additional in chosen areas utilizing Dodge and Burn. These instruments can get actually garish, so I set them to a low publicity and solely do one go. The background is lacking some circulation. I need it to assist lead your eye across the piece. For the ultimate go I take advantage of the feel brushes once more to tweak these shapes so that they wrap across the mannequin. With that, I name it accomplished!For extra ideas, see our piece on life drawing on an iPad. Additionally see one author’s expertise utilizing a drawing pill for picture enhancing.
Do you will have a digital artwork tip? Share your recommendation within the feedback part beneath.