

I like to make use of a comic book inking and rendering fashion when creating fast ideas, usually executed for online game or animation tasks. I am utilizing Photoshop, however this workflow works particularly nicely when paired with any of one of the best digital artwork software program and among the finest drawing tablets, supplying you with precision and management that mimics conventional inking whereas staying absolutely digital.This specific fashion has a number of advantages, considered one of which is sort of instantly creating excessive distinction in key areas. This forces you into good habits resembling breaking down the picture into worth teams, creating robust key lighting, and crafting well-defined varieties, which could be tough for lots of newbie artists.I’ll be discussing how I laid down the foundations for this sort of rendering and the way every early step you’re taking units the inspiration for the later ones to be accomplished extra effectively. In fact, there are lots of different routes to the identical consequence, however I’ve discovered following this course of significantly efficient for getting a ultimate rendered picture accomplished rapidly.
It’s possible you’ll like
The most important distinction may come from understanding that the black ink work can do a whole lot of the heavy lifting in the case of rendering. However whereas that’s true, there are easy tips we will use to push and pull that ink shadowing round that may profit the ultimate picture. You’ll discover this significantly within the latter phases after we get to masking, overlays, and extra sharpening layers.In the event you’re eager to refine your expertise in Photoshop, be taught extra from our listing of Photoshop tutorials, the place you’ll discover ideas that pair completely with this comic-style workflow.Hopefully, you’ll end up adopting a few of these methods into your workflow!
1. Create an preliminary sketch and thumbnail
(Picture: © Unknown)
Concepts can come from anyplace and it’s sensible to attract a number of thumbnails to conceptualise an preliminary concept or temporary. Getting the primary 5 or so concepts down on paper is helpful, though on this case I already had a good suggestion of what I needed to go for. I used my Principal Boi brush to get a sketch of a botanist robotic gathering flowers that develop round a mischievous historical tree.
2. Take into account the worth key and lighting
(Picture: © Unknown)
Utilizing the identical sketch, create two or three new layers and began separating the values into teams. This creates an outlined background and center, and probably a foreground. By protecting the values to a simplified vary of 2-3 per layer, we will guarantee the worth layers stay visually separated too.
3. Develop a color key for tone
(Picture: © Unknown)
Color keys are nice for setting the tone alongside the earlier worth key for lighting. For my piece, I caught with a easy triadic palette of a spread of greens and dipped into complementary accents for the blue and orange parts, which will probably be targeted on glowing areas. You can too begin incorporating different brushes at this stage to make the color variation simpler. Additionally begin to consider the shadow placement.
4. Draw a line sketch
(Picture: © Unknown)
The clear line sketch might be crucial early-stage step. That is the place the design solidifies and is often a part of the ultimate render. That’s why we must always take our time right here, utilizing line drawing methods to finalise the design in its easiest type so it has the strongest foundations for the later phases.
5. Start the inking
(Picture: © Unknown)
The fashion actually involves life right here. By concentrating on inking the shadows, which is basically ambient occlusion, we will use big sections of black to cut back the quantity of rendering wanted and solidify the shape by silhouettes. Give attention to creating dynamic mini shapes inside the bigger composition and at all times keep in mind the route of your lighting. Since my piece is considerably backlit, I additionally added shapes within the foreground that had been crammed with ink.
6. Clear up
(Picture: © Unknown)
Now we have now our ink, it’s time to wash it up and lay out our fundamental masks and layers prepared for portray. Break these into key shapes adopted by materials separation. For instance, my bigger tree character will probably be one huge form and layer, whereas the vines, moss, eyes and leaves are positioned on prime with an alpha channel masks.
7. Fill out shapes with flat colors
(Picture: © Unknown)
Subsequent, effectively apply flat native colors to the layers. Utilizing the color key as a information within the top-left nook, you may maintain a continuing reminder of the place you need the piece to finish up. Generally issues can change throughout this natural course of; for instance, I added the blue vines rising out from the tree so as to add extra connection and main strains between it and the robotic character.
8. Add colors and preliminary tones
(Picture: © Unknown)
Now comes the beginning of the true portray course of! Utilizing a delicate spherical brush, begin taking part in along with your values and tones. For me, that meant making use of illuminated tones, dappling extra lighting to the grass flooring, and including some delicate glows across the blue flower. I additionally began to dam out the least essential a part of the picture, the background, to get a way of the extent of element required.
9. Render the background
(Picture: © Matt Sanz)
Duplicate and flatten the non-essential layers right here so that you don’t paint greater than you want. By merely filling them in with black, it lets you deal with the background rendering. I needed my background to be tremendous painterly, so I largely used the Onibi_Mattsanz brush and wasn’t very exact in regards to the accuracy of the main points, as I knew it will profit from contrasting with the primary focus layers.
10. Soften the ink
(Picture: © Matt Sanz)
That is the place we promote the fashion. By creating an alpha channel masks on prime of the line-art and ink layer, we will now fill it with color whereas protecting the form. I usually do that to cut back focus by softening the heavy black, or artificially creating a way of illumination by having the item be so vibrant that it illuminates its personal line-art. Mess around with the Linear Dodge, Overlay or Color Dodge blends to search out what works finest for you!
11. Tweak in between values
(Picture: © Unknown)
Some precise portray comes into play right here. Now that the whole lot is nicely on its means, we will paint in some color variation resembling lighting route particulars. I don’t often paint a lot variation, and nearly maintain to a three-band cel shading look, because it helps distinction towards the busy background and stands out. My Principal Boi brush is nice right here only for mixing switch colors. Choose the colors to make sure you don’t lose saturation!
12. Polish the glows and supplies
(Picture: © Matt Sanz)
As soon as the majority of the portray work is full, you may flip to the layer choices once more to create glow on a number of the lighting areas utilizing Color Dodge. Ensure to repeat the identical impact on the ink layer so the glow actually burns into the black ink and shines. Any metallic areas would react barely in a different way, however as you may see, I nonetheless saved to a easy quantity of colors and values.
13. Break the mould
(Picture: © Matt Sanz)
As a result of we’ve saved the whole lot on such clear layers, we will now choose the primary ink layer and use black to interrupt up the silhouette slightly extra with extra particulars, just like the vines, leaves and so forth in my art work. Maintain pushing and pulling to see what feels proper in your piece. You possibly can even push again with some black ink within the softening layer, as I did for the vine within the foreground.
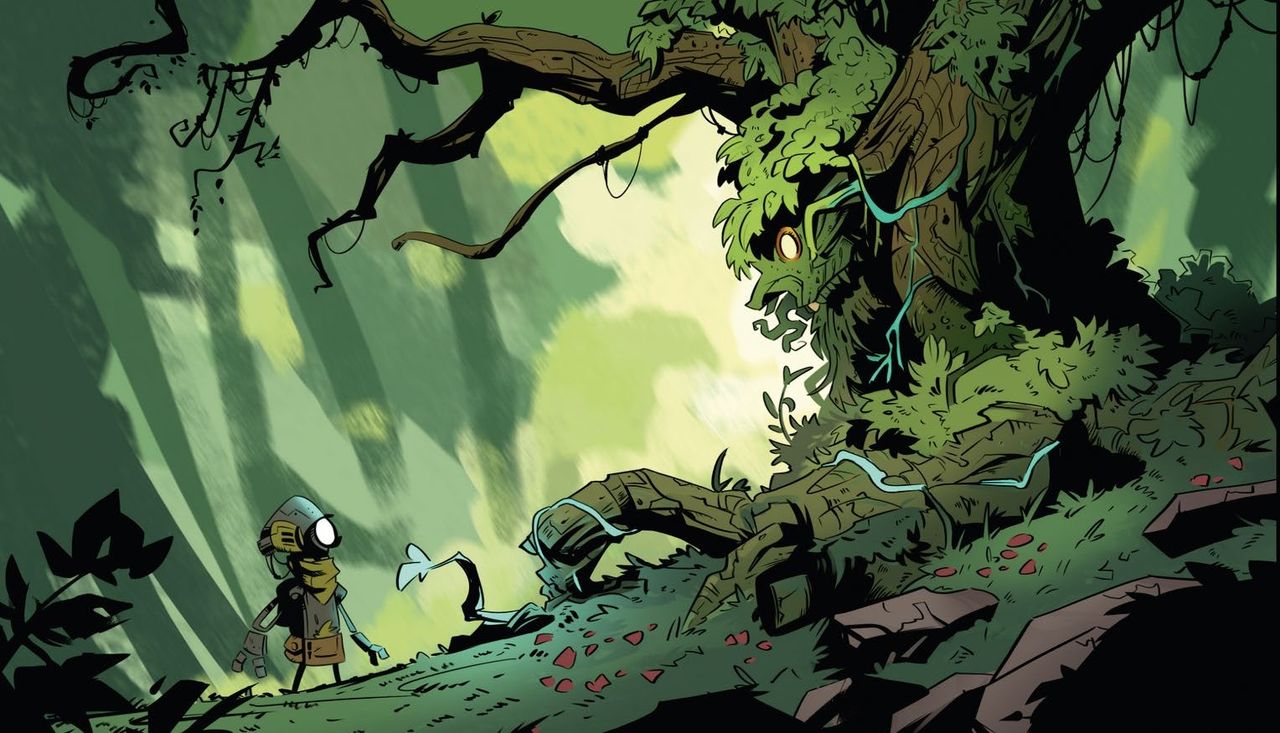
14. Add the final parts
(Picture: © Matt Sanz)
With one ultimate layer on prime of the whole lot else, utterly ignore the foundations we constructed and easily and effectively go over your complete piece with the Pencil brush, including in additional particulars with out the restrictions of the present layers. This permits for inventive, expressionist particulars to be created with out your layers getting out of hand. You can too add a noise layer to cement the comic-style rendering as it will seem within the printing course of.
Each day design information, critiques, how-tos and extra, as picked by the editors.