

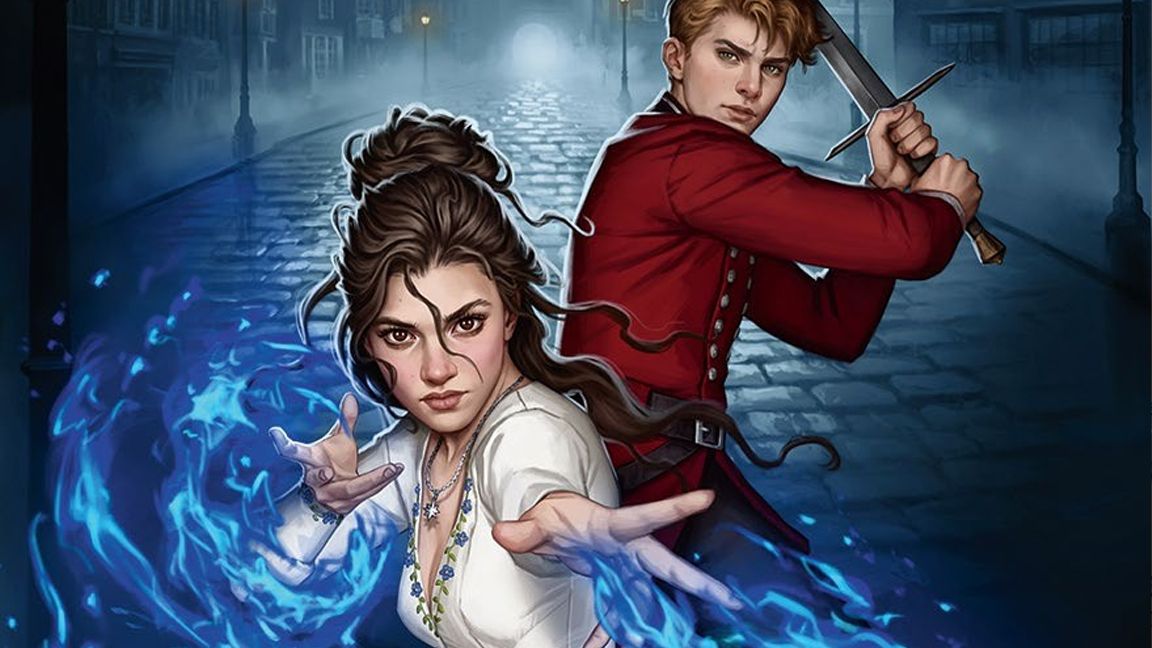
That is the quilt artwork for Laura E. Weymouth’s fantasy novel Metal and Spellfire. It’s set in Valora, a metropolis impressed by Victorian-era London. The primary protagonists are Pandora Smalls, who has discovered to hone and wield her magic in a means the world has by no means seen, and Equipment Beacon, a promising younger member of the Royal Guard. Pandora’s magic – known as Spellfire – takes the type of blue flames. Within the scene, we see Pandora and Equipment dealing with up towards a monster in a darkish alley.For this tutorial, I’ll information you thru the method of making a guide cowl illustration identical to this. We’ll discover drawing the tough idea, convey your concept at an early stage, and creating dynamic compositions, during to finalising the main points.To observe alongside, you’ll want a strong understanding of anatomy – sufficient to have the ability to draw characters in a wide range of poses and angles. Additionally useful is a grasp of fundamental composition fundamentals similar to steadiness and focus, plus customary lighting and color ideas.
It’s possible you’ll like
I used Photoshop for this piece, however any of the most effective digital artwork software program you’re comfy with ought to work effectively, as we’ll be working with pretty customary instruments. Having probably the greatest drawing tablets makes an actual distinction too, permitting you to take full benefit of pen strain and brush management. In the event you’re new to Photoshop or wish to refine your expertise, I’d additionally advocate testing some useful Photoshop tutorials that cowl strategies related to this type of digital portray.(Picture credit score: Fernanda Suarez)
1. Get ready with analysis and a temper board
(Picture: © Fernanda Suarez)
When working with a shopper, we’re given a quick with the fundamental idea for the quilt. Having that, the very first thing to do is get some analysis in. Search for photographs that work with the concept you take note of, function references, or present inspiration. While you’ve obtained a group prepared, create a temper board and a color palette. The shopper may additionally present examples out of your portfolio that they like.
2. Engaged on the preliminary sketch
(Picture: © Fernanda Suarez)
It’s time to work on the tough sketch. This may look messy, however don’t fear! We wish to create one thing dynamic, so the characters’ poses require a sense of motion. The thought is to attempt to seize a second the place the character is in movement somewhat than static. You need to use diagonal strains to information the position of the characters and search out steadiness throughout the composition, incorporating focal factors whereas leaving different areas naked.
3. Cleansing and adjusting
(Picture: © Unknown)
I like experimenting with completely different line weights, which might help create a visible hierarchy. You can too clear up the road work if it’s too messy; the necessary factor is to maintain it readable for the shopper. Give attention to the characters’ expressions to make sure they convey the precise emotion and depth wanted. Having the characters look immediately on the viewer creates stronger engagement.
4. Creating the color mock-up
(Picture: © Fernanda Suarez)
When you have got a sketch accredited, begin work on the color mock-up. That is the place we resolve on the color scheme and lighting. Utilizing a spherical soft-edged brush, shortly add color and place mild and shadow. We have to set the general temper for the piece, so the values and color are essential. My picture can have cool color temperature and have darker, ambient lighting.
5. Setting base
(Picture: © Fernanda Suarez)
To start the refined rendering stage, I wish to create separate layers for all of the completely different parts of the picture, similar to pores and skin, hair, clothes, magic, and so forth. Fill within the full space or form for every of these parts after which lock the layer while you’re finished – then we will transfer on to including flat colors.
6. Including color and lightweight
(Picture: © Unknown)
This can be a polished model of the color mock-up. With flat colors on all of the separate layers, use a spherical soft-edged brush so as to add mild and shadow the place wanted, in addition to color variation. It’s important to remember the lighting and color scheme you’ve chosen. Including some rim lighting to the characters additionally helps to create extra depth. I counsel specializing in the characters to start with and retaining the background from the mock-up.
7. Start the rendering
(Picture: © Unknown)
Now’s the time for extra refined rendering. Paint the characters with a barely hotter color palette at first, then modify the temperature additional down the road. At all times focus first on the principle focus of the picture, in my case, the 2 characters. Utilizing a spherical, hard-edged brush, sculpt and outline the larger areas of the face. We’re creating arduous edges with our brushstrokes now.
8. Go step-by-step creating the face
(Picture: © Unknown)
For the face, give attention to the larger volumes first, such because the brow, cheeks, nostril, and jaw. Subsequent, add the finer particulars to the eyes, lips, and different options. To realize a pleasant pores and skin texture, keep away from over-blending your brushstrokes. If it’s a sensible look you’re aiming for, you want color variation – for instance, including crimson to the cheeks or a cooler color beneath the eyes.
9. Use two layers for the hair
(Picture: © Unknown)
While you do hair, use a base layer that covers the whole form. Add a brand new layer on high and begin portray the highlights with a lighter color – my Multitask and Multitask Gentle brushes on this concern’s sources are nice for this. Lock each hair layers and modify the worth and color as wanted for depth and quantity.
10. Designing the clothes
(Picture: © Unknown)
The Multitask brush can also be appropriate for garments, that includes a spherical, hard-edged brush for finer particulars. It’s important to know the kind of materials you’re portray to know its qualities and translate them right into a portray. On this case, I used to be portray a silky ivory gown that’s shiny and flowy, and a guard uniform that’s thick and opaque. Simply as with the pores and skin, I desire to depart brushstrokes seen.
11. Fixing any errors
(Picture: © Unknown)
I labored on the male character at this level and added the blue flames utilizing my Hearth brushes. You would possibly catch one thing that must be mounted at any second. For instance, I wanted to regulate the angle of the male character’s head so it adopted the road of motion and backbone extra successfully. If every thing is on separate layers, it must be simple to alter.
12. Engaged on the background
(Picture: © Unknown)
Along with your characters virtually accomplished, change your consideration to the background. I’ve the objects and buildings of my background on separate layers as effectively. I initially labored on the design in black and white, then added color again utilizing Color, Colour Steadiness, and Overlay changes. I did this to save lots of time and since it doesn’t require quite a lot of completely different colors.
13. Creating environment with results
(Picture: © Unknown)
To finish the scene, pump up the environment by including depth by worth changes. I additionally added fog to my picture to reinforce the temper and evoke a chilly sensation, plus a heat glow to the lamps for distinction. The blue flames had been additionally developed with highlights utilizing the Multitask Gentle and Hearth brushes.
14. Make a mock cowl design
(Picture: © Unknown)
Lastly, I wish to tie every thing collectively and improve the picture to look nearly as good as potential. For instance, you possibly can modify the distinction and values utilizing a Ranges layer, tweak the colors with a Colour Steadiness layer, or intensify color with an Overlay layer. These are delicate changes that finalise every thing.
This content material initially appeared in ImagineFX journal, the world’s main digital artwork and fantasy artwork journal. ImagineFX is on sale within the UK, Europe, United States, Canada, Australia and extra. Restricted numbers of ImagineFX print editions can be found for supply from our on-line retailer (the delivery prices are included in all costs).Day by day design information, evaluations, how-tos and extra, as picked by the editors.