

Portray from life is a deeply rewarding observe – one that may’t be totally unpacked in a single tutorial. However on this session, I wish to share a way I actually get pleasure from when it’s not sensible (or heat sufficient) to color outdoor.For me, life portray is much less about producing completed items and extra about sharpening my remark abilities. It’s a means of finding out actuality that feeds straight into my studio work. Conventional portray from life requires planning, dedication and the willingness to dwell with every mark you make. However we’re now spoiled for selection with regards to digital instruments, and these can encourage a looser, extra forgiving strategy.I’ve discovered that engaged on a pill, particularly one thing like an iPad with Apple Pencil, hits a candy spot between the construction of conventional media and the pliability of digital portray. Whereas apps like Procreate can’t match Photoshop for options, their targeted, streamlined toolsets make them preferrred for on-the-go research. Actually, I discover Procreate’s limitations useful since they encourage deliberate decision-making and hold the method direct and intuitive. Its responsiveness, portability and affordability make it a near-perfect companion for all times portray within the wild (or in a museum like I will be doing right here).
You could like
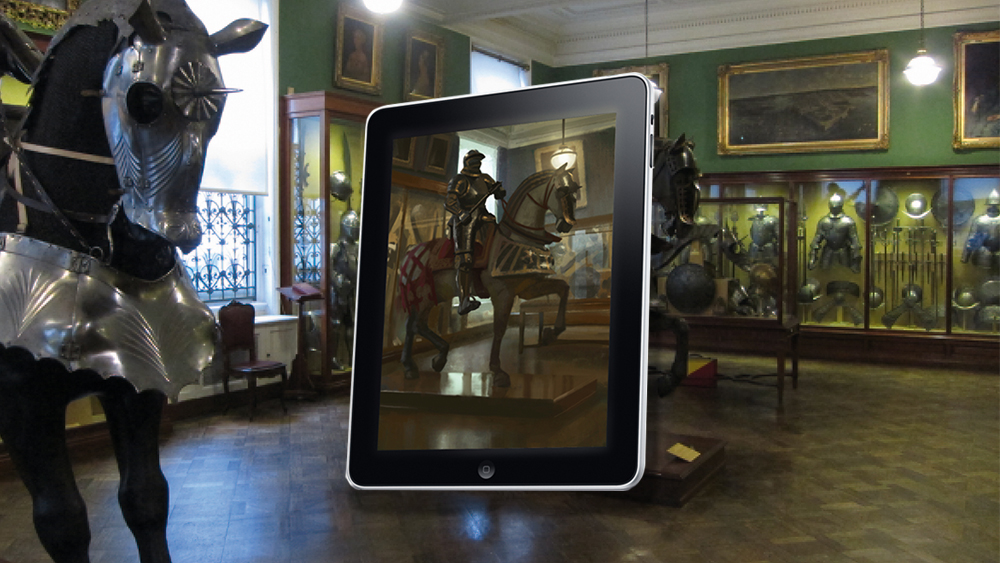
For this session, I took my iPad to the Wallace Assortment in London’s West Finish – a quiet, atmospheric museum full of unimaginable topics. I selected to color a swimsuit of medieval armour, drawn to its advanced surfaces and refined color shifts. Right here’s the way it went, and how one can do that strategy for your self.See our information to the perfect iPad for drawing should you’re questioning which mannequin to go for, or see our decide of the perfect drawing tablets for different choices. We even have a information to the perfect laptops for drawing.
01. Discover a composition
As soon as I’ve determined what to color I check out it from totally different angles, looking for a satisfying composition. Most museums present stools to take a seat on so that you don’t have to face up or sit on the ground. I accept a spot the place I’ve positioned myself able that places a shiny window proper behind the top of the knight. This could hopefully give a contrasting point of interest to my composition. The lighting within the room is a bit boring, however there’s a pleasant variation of supplies so I can most likely deal with that.
02. Get your canvas moist
First I lay in some background colors, choosing values within the decrease midtones. I wish to create a flat background that has some vibrancy to it. On prime of my background, on a brand new layer, I tough within the form of my foremost topic utilizing a soft-edged brush. I make it look ugly virtually on function, making certain that I embrace all of the totally different parts. I then transfer this form round, reworking it to see the way it’ll match into the composition. I begin portray in a panorama format, however then realise that this picture will most likely look higher as a portrait.
03: Measure the proportions
As soon as I’m proud of the form and its dimension on the canvas, I begin assessing its numerous parts. What I’m attempting to do is ensure that issues are appropriately positioned relative to one another; I’m trying to see the three-dimensional kind in entrance of me as a two-dimensional form that I can paint. After I paint this massive form, I’m toggling between the Brush device and the Eraser device. This leaves me with a clear form that I can later lock as a masks. As I develop extra assured that issues are in proportion, I slowly work in the direction of a sharper-edged silhouette.The foreground form helps me to measure and evaluate the sizes of the shapes within the background. If issues don’t add up, there’s most likely one thing improper with the foreground form, so I bounce again to it every so often to make alterations or corrections. I pay significantly shut consideration to the angle of the partitions and flooring, attempting to seize the best depth by precisely measuring the dimensions of the shapes additional again within the room.
04: Higher perspective
Although I attempt to be as exact as I can, I’m not proud of the angle. To assist me alongside, I load in a grid as a Multiply layer to verify all of the traces go to the proper vanishing factors. It is a nice assist, however I all the time attempt to paint with out the grid first, for observe. As soon as these preliminary steps are performed, what I find yourself with is basically a drawing. Not a traditional line drawing, however a drawing made up of shapes of flat paint. From right here I can transfer on to the subsequent stage of my artistic endeavour.
05: Lock alpha pixels
One of many nice benefits of digital instruments is the likelihood to create masks. There’s no Choice device or Layer Masks in Procreate, however I work round this by locking the pixels I’ve painted in order that they turn out to be their very own masks. It’s the identical factor that Photoshop calls Lock Clear Pixels. Merely click on the alpha image on any layer and also you’ll lock its pixels.
06: Mannequin the shape
After locking the foreground, I decide an enormous brush and blob in some colors. I take advantage of brushes which have semi-transparency and smudgy traits. Nonetheless conserving issues smooth, I’m attempting to indicate the shape with some refined variations between chilly and heat areas. I look across the room, noting which lights are current. I additionally attempt to be aware of how the lights have an effect on the color temperature of the shadows. The inexperienced partitions don’t look significantly good to me, so I resolve to redecorate and paint them gray as a substitute. To date so good!
07. Describe supplies
I attempt to play up the variations within the supplies, portray the velvet fabric in the back of the horse with very smooth brush strokes, contrasting this with the sharp, edgy look of the armour on the horse’s chest. When portray up the totally different surfaces like this I have a tendency to leap between foreground and background, portray no matter attracts my consideration. This manner I can slowly construct up the main focus the place I need it. When reflections and edges look too sharp or shiny, I take advantage of the Smudge device with a scatter brush assigned to it, to melt the paint strokes.
08. Masks necessary particulars
There’s loads of overlapping occurring across the knight so I resolve to color the mace he’s holding individually. To assist me see what I’m doing I paint it in a powerful contrasting color at full opacity. Up till this level I’ve hardly zoomed in in any respect. Staying zoomed out helps me see the larger image, however generally the brushstrokes simply aren’t correct sufficient so I zoom in to verify issues find yourself in the best place.
09. Color the masks
As soon as once more, once I’m proud of the form of the mace, I lock the layer and color it in. To make the knight’s hand learn slightly higher, I broaden the reflection on the leg armour behind the hand.
10: Deliver life to the background
After working up the foreground, the background begins to look plain. I paint the cupboards behind the knight on a separate layer. To make the foreground come out I ensure that no edges within the background are too sharp, however I nonetheless attempt to describe the shapes as precisely as attainable.I pay shut consideration to the window’s boring reflection throughout the ground, remembering to carry out the sharp distinction because it displays within the plinth. precisely as attainable. I pay shut consideration to the window’s boring reflection throughout the ground, remembering to carry out the sharp distinction because it displays within the plinth.
11. Add ambiance
To make the horse and rider stand out slightly, I add some lighting results. Utilizing a big brush I tough in some darkish blue paint on a brand new layer set to Add. Then I smudge this paint with a Scatter brush till I produce a satisfying, textured gradient. I take advantage of the identical course of to create a glow for the ceiling gentle, however this time I put it in entrance of the horse’s head to create a form of flare.
12. Glass reflections
These might be difficult to get proper so once more I do them on a separate layer. I paint an opaque form, lock it, and provides it some texture and color variation. It takes a short time to get a form that appears passable.
13: Balancing reflections
When the mirrored form appears to be like nearly proper I take advantage of the Eraser on a really low opacity to rigorously reveal what’s behind it.
14: Ultimate touches
I generally tend to color a bit darkish with not sufficient distinction, so after I end a sketch I generally open it in Photoshop to crank issues up with a Curves or Ranges adjustment layer. One good characteristic of Procreate is that you would be able to export PSDs should you do wish to implement particular tweaks to sure layers.You may see extra of Karl Simon’s work on his web site.For extra suggestions, see our piece on life drawing on an iPad and our roundup of Procreate tutorials. Additionally see one author’s expertise utilizing a drawing pill for picture enhancing.
Do you will have a tip for digital artwork observe? Share your recommendation within the feedback beneath.