

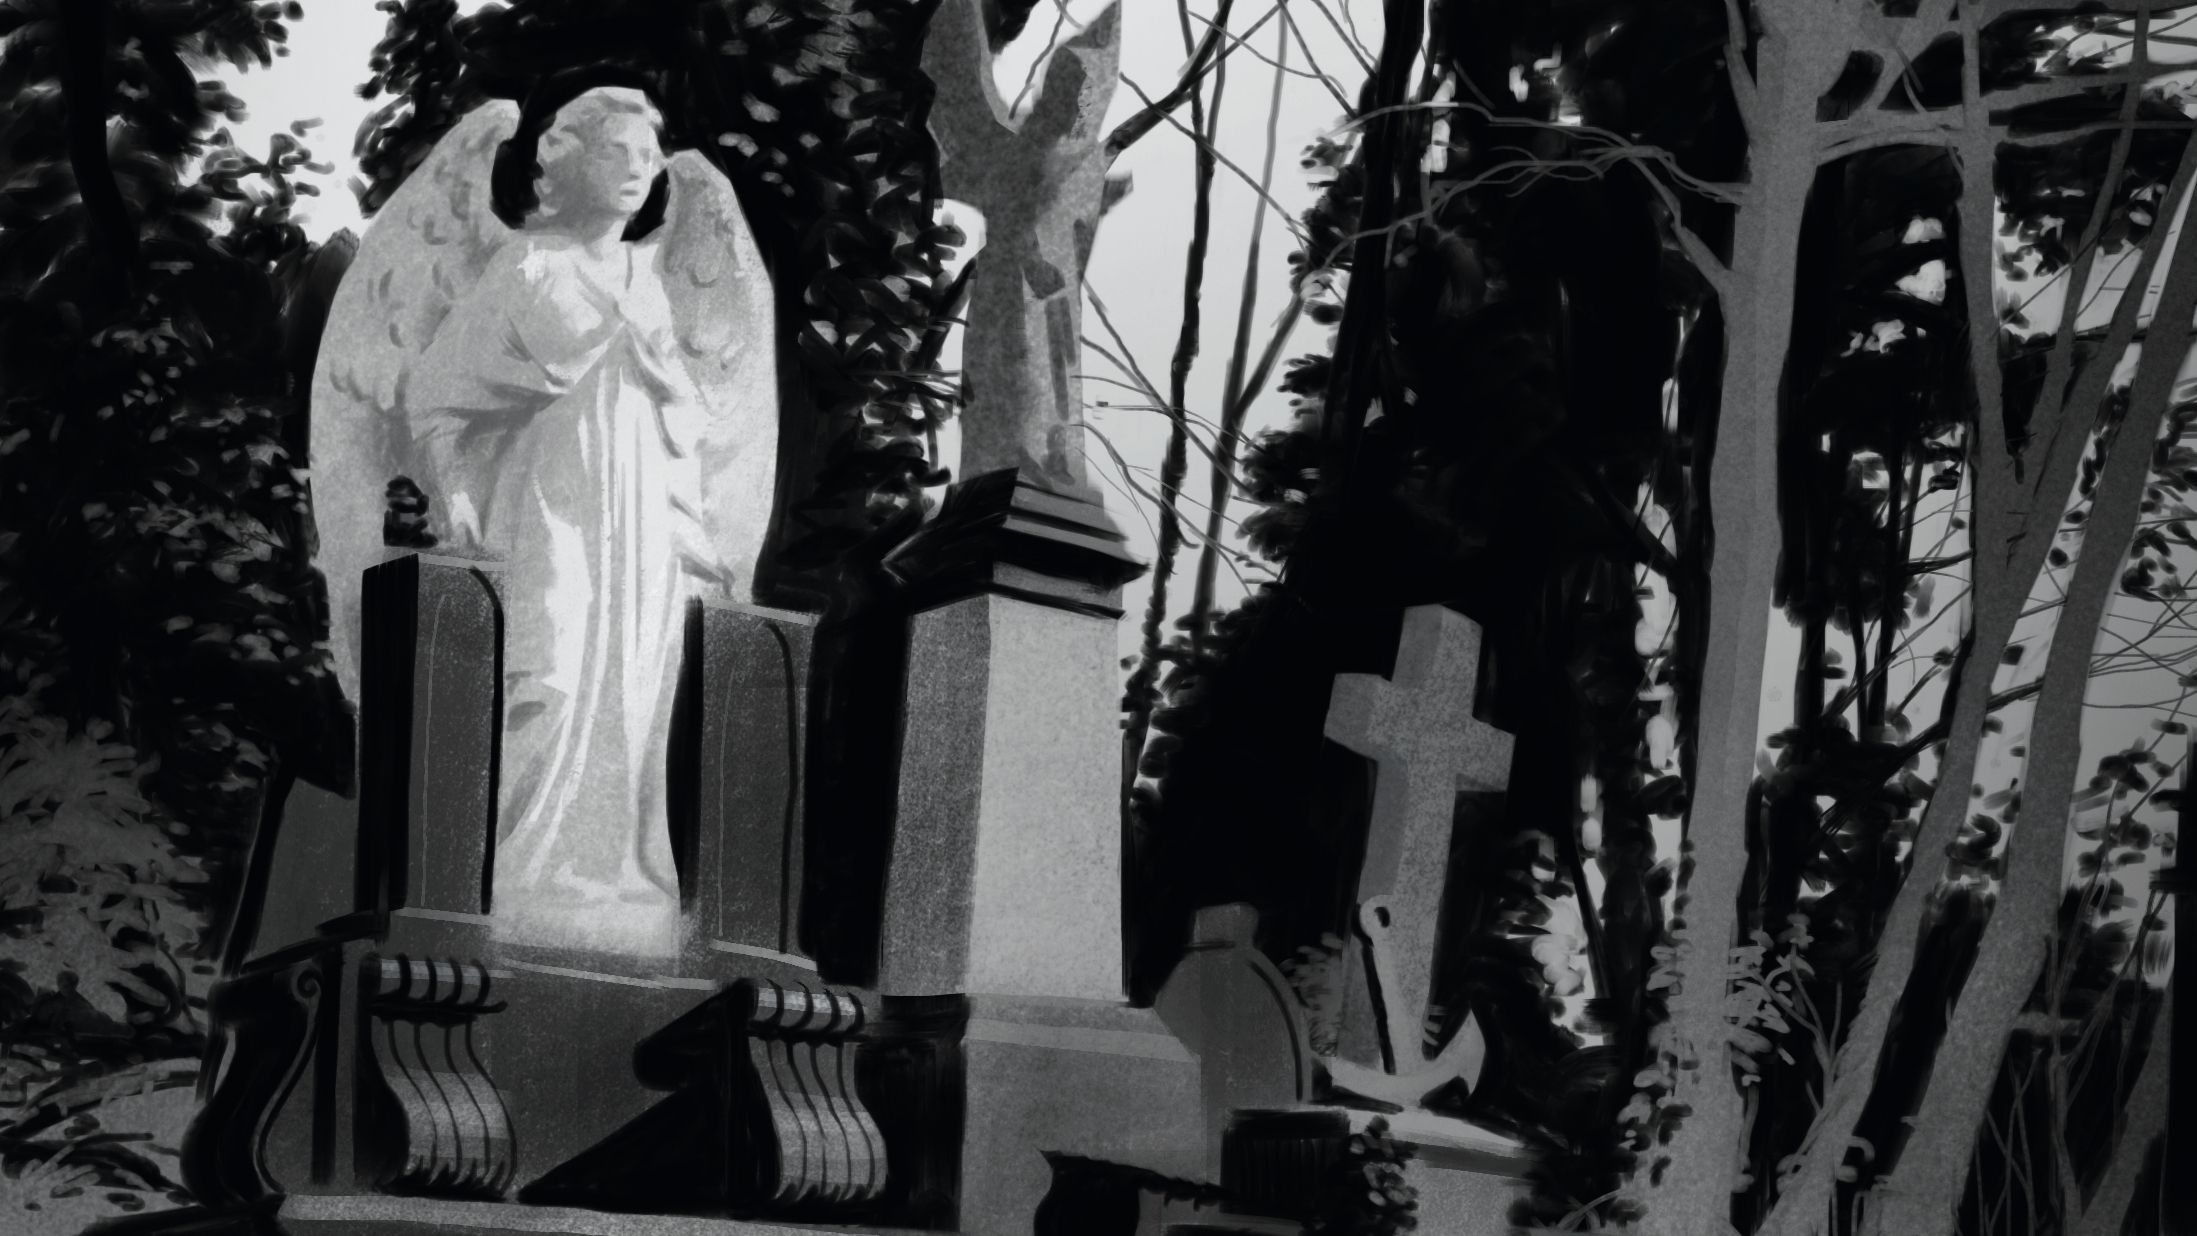
I get inspiration from all types of sources, together with books, movies, photojournalism and different artists’ works. However most inspiring are the issues I see round me in my every day life. Nice compositions and topics are in every single place, to not point out the moods and lightweight that the climate and seasons deliver! Considered one of my favorite locations for sketching is Highgate Cemetery in London. Regardless of the place you flip you see one thing that wishes to be drawn.For this tutorial, I’ve settled for a easy view of some graves in opposition to a backdrop of darkish bushes coated in vines. I’m planning to make a distinction drawing utilizing strategies just like those I apply when tackling the sort of topic in conventional media.After I do a research on paper, I have a tendency to separate the work into three levels: drawing, inking and colouring. This works simply as nicely for digital mediums however since this picture is to be black and white, I gained’t be utilizing any color. The final step is solely executed in shades of gray as an alternative.
It’s possible you’ll like
Should you want the instruments, see our choose of the most effective drawing tablets and the most effective digital artwork software program. Should you’re prepared, let’s begin drawing.
01. Discovering a view
I search for a composition, looking for a spot the place the topic of my portray seems to be fascinating. I think about the place of the solar, how a lot of my topic is in gentle/shadow, and so forth. I resolve to sit down in a spot the place the angel statue of the grave closest to me has a darkish mass of inexperienced behind it. This would be the predominant focus of the picture and the sunshine angel in opposition to the darkish backdrop ought to make for a pleasant graphic learn.
02. Blue strains
I’ve determined to go for a standard strategy right here, so I begin off with a line drawing. Ensuring I measure issues fastidiously, I sketch in a blue line (it’s going to assist later) on white background. Drawing on a pill is sort of fiddly in comparison with pencil on paper and the ensuing line work is just not precisely stunning, however the essential factor right here is that the angle and the relative scale of issues is right.
03: Adjusting the composition
Regardless of wanting fastidiously for the correct framing once I began, I really feel the composition is just not proper. I scale the entire picture down, permitting for extra of the bottom airplane to indicate on the backside of the picture. This provides depth and leads the attention into the image. I additionally divert from actuality a bit by cutting down the cross on the correct and by shifting the small angel within the center up. After some extra perspective changes I’m pleased with the drawing.
04: Getting ready for ink
I set the drawing layer to multiply and create a brand new layer beneath. This can be my ‘inking’ layer. On this layer I’ll work solely with pure black and pure white, however to see the road work on high of the black, I cut back the opacity of the layer to about 75 per cent. I’m cautious to not color choose after doing this, as I’d be selecting gray quite than pure black.The blue line makes it simpler to see the drawing in opposition to the darkish ink. I’m utilizing Procreate’s default Moist Spherical and Moist Sq. brushes. Any gray values come from the smudging of the brushes. In my thoughts I’m considering of solely black and white. The trick right here is to make the picture work with solely these two values.
05: Design what you see
I observe the scene in entrance of me and begin to plan out what shapes to color black and what to go away white. That is the place your design sense is available in. Plan fastidiously as the 2 choices accessible are black shapes on a white background or vice versa. In some locations I put a black form subsequent to a black form, shedding the sting, and generally white in opposition to white.
06: Simplify the background
The foliage behind the graves serves as a pleasant backdrop. Although I can see loads of completely different values in there I resolve to make it into an nearly stable black form. In just a few locations I paint in some white patches describing just a few leaves. If I had been doing this in actual ink, I’d have had to attract these leaves after which fastidiously paint round them.
07. Silhouette or kind?
I work across the picture, designing the black and white shapes that I really feel finest Describe the shape. For the background, the shapes are merely silhouettes, whereas within the foreground, the shapes present which facet of an object is lit and which is in shadow. The one factor I miss is the leftmost angel. I need this to come out so I plan to offer it a lighter shadow worth later.
08: Simplification is vital
Even once I paint from life, I prefer to generally simplify and stylise the values of the picture. By placing the distinction the place I need it, I can lead the viewer’s consideration to, or away from, one thing. So at this stage I believe it’s okay to maneuver away even farther from making an attempt to repeat actuality precisely, and shift extra in direction of a design that I believe will work nicely for the temper I need to create.For now I’m leaving the sky fully white and every part else a darker worth. I make a brand new layer beneath the ink and fill this with a medium gray. On high of this, I make a brand new layer for the sky. I’m going round with a stable brush (no transparency) and masks within the sky with white paint. Now I’m free to color something beneath with out operating the danger of staining the white sky.
09. Low distinction washes
Utilizing a barely textured, massive outsized brush, I begin laying down some values. I don’t go into any element, solely massive gradient washes of paint. I need the bushes and the vertical planes of the graves to be barely darker, and the bottom/ horizontal airplane to be barely brighter. Watching my worth vary, I be sure that I don’t use an excessive amount of distinction, solely refined shades of gray.
10. Native worth variations
Not all of the issues in entrance of me are made Not all of the issues in entrance of me are product of the identical materials, so after I’m pleased with the preliminary worth washes, I’m going in with a medium sized brush and convey out the native values of the completely different components
11. Going again to the point of interest
Now’s the time to return and ink the angels as I need to ensure that they ‘pop’ simply sufficient from the background. On a brand new layer, I begin working with the Moist Spherical brush to explain the type of the angels. I don’t need the shadow facet to mix in to the background, so as an alternative of black I take advantage of a medium gray. As soon as I’m pleased that the shapes are wanting okay, I lock the alpha pixels of the layer after which give it a little bit of texture utilizing the identical brush that I used for the worth washes.
12. Supplies
At this stage the picture is beginning to really feel coherent so I resolve to place down some particulars, making extra correct materials descriptions. I just like the distinction between the sunshine, matte angel and the darkish, shiny headstone, so I play that up by placing some highlights on the darkish materials. I additionally resolve to offer the angel a 3rd worth, it being the principle focus of the picture. After that I bounce round all around the picture darkening and lightening areas as I see match to make it work higher.
13. Ending up
I’m not fairly pleased with the foreground, particularly the foliage, so I’m going again to the ink layer and re-work some areas. The white sky seems to be a bit bit too robust so I knock it again with a refined gradient. After that it’s time to go house and cargo the picture into Photoshop for some remaining distinction changes after which we’re executed!For extra suggestions, see my tutorial on how I take advantage of an iPad to color from life in a museum.
Do you might have artwork tip? Share your recommendation within the feedback under.