

It’s not unusual to see a gorgeous pencil or ink drawing that’s been butchered below a number of layers of poorly constructed digital colouring. Textured brushes are designed to copy real-life brush, pencil, or ink marks, so why not utilise the facility of these actual marks which have already been laid down on the paper?On this tutorial, you’ll be capable of comply with together with my colouring course of, see which brushes I exploit to imitate my drawing and shading, and learn to preserve useful info, similar to line high quality, shading, textures, and imperfections, whereas elevating your piece digitally.It’s necessary to understand that your primary setup is vital to lining up for achievement from the start; the issues I look out for are scanning decision (I exploit 600DPI or extra), and choosing brush packs that comprise brushes near those used within the unique piece. Nonetheless, there are many default brushes already accessible in Procreate that work splendidly, particularly the pencil and ink ones. Take into accout, in case your digital mixing seems too clean, it will possibly overpower any close by textures and stick out as a mistake.
You could like
Learn our assortment of Procreate tutorials for extra recommendation, and our record of the very best iPad for drawing to see which is greatest for you.
1. Separate the unique scan into a number of layers
(Picture: © Eliza Ivanova)
The very first thing we’ll have to do is ready up our scanned drawing able to be labored with digitally. Cut up it into at the very least two layers, most significantly, the topic layer and a background layer. If the topic is fairly properly contoured however there are further components of shading exterior the topic traces, embrace these within the topic layer. To keep away from harsh edges whereas separating the picture into layers, use the Feather possibility at 2-3% to melt the choice’s edges, then Lower and Paste. I additionally use the Multiply Mix Mode for the topic layer.
2. Use layers as fast choice instruments
(Picture: © Eliza Ivanova)
The primary motive for Step 1 is to have a fast method to choose the topic and begin colouring. Do that by going to the topic layer and clicking on it once more to immediate extra choices to pop up. Click on the Choose button to decide on the entire contents of that layer, then create a brand new layer whereas the choice continues to be lively. Lastly, use Procreate’s ColorDrop possibility (dragging and dropping the color from the Shade Wheel) or a brush to dam in a brand new layer within the form of the topic. To any extent further, we’ll use this layer for colouring and shading.
3. Determine in your line-up of primary brushes
(Picture: © Eliza Ivanova)
Let’s put together the essential brushes that we’ll use all through this piece. For the overall colouring, I selected Salamanca, for mixing, I chosen Eaglehawk, and for erasing, I picked a primary onerous airbrush with a bit additional Fall Off on the ends. I want my erasers to have a clear, onerous edge that I can at all times texture in a while with the mixing software. Lastly, my mixing brush leaves a textured look with out smoothing out the unique brush an excessive amount of, so I get a pleasant pairing and variation without having to redo the brushes.
4. Add color textures and variation from the start
(Picture: © Eliza Ivanova)
I wish to get some enjoyable textures into the bottom color as early as doable to maneuver on from the essential block color as rapidly as doable. Utilizing the painterly brushes, punch up the sunshine and shadow values from the pencil layer to spotlight what’s already there. Subsequent, add some color bleeds to once more punch up the darker spots within the drawing, in addition to across the silhouette. With the short addition of 1 additional color, you create the impression of subtle colouring simply by the gradation and mixture of the 2 colors used.
5. Make the background dynamic
(Picture: © Eliza Ivanova)
I typically depart the backgrounds round my figures as clean unfavorable area. This impact works properly with pencil sketches, the place quite a lot of the lacking components are implied environments. Nonetheless, on this case, I needed to construct on what was already there and wanted a drastic change so as to add a brand new focal point that also highlights the principle determine. So, with a chunky brush, I blocked in a darkish background form, with the unfavorable area now damaged up right into a midground and background so as to add a refined dimension. I additionally launched a 3rd color to the determine, ochre, and tied it with the background within the type of tough flowers and leaves. The black form cloaking the character was additionally expanded, and the color temperature of the pencil was adjusted to be a contact extra blue.
6. Create a brand new layer for the main points
(Picture: © Eliza Ivanova)
The following step is to start including and refining the general element. I sometimes add 5 – 6 element layers for various functions: one to refine roughed-in shapes, one other to check out design components, one other to check concepts for lighting or textures, and so forth. These layers are hardly ever flattened, because it’s crucial to have the ability to management and revise as we go. On this step, you might additionally add a clean-up layer like I used to work on the flower tattoos on the topic’s arms, in addition to some highlights within the face and eyes to make them seem supple and dewy.
7. Dig out some depth
(Picture: © Eliza Ivanova)
At this level, I used to be proud of the path of the piece and determined to check out some floating components so as to add yet one more foreground element and barely develop the depth. The floating ribbon is colored in such a method that it overlaps itself, and the identical goes for the floating ovals. Any small variation provides to the general impact of depth and class, even when it’s a refined contact. Such particulars are playful and necessary in having the determine really feel suspended in its setting; a dance between fantastical design and what’s actual.
8. Take note of particulars
(Picture: © Eliza Ivanova)
Zoom in and deal with small notes as if with a magnifying glass, as digital screens might be misleading when zoomed out. Pay additional consideration to particulars on the face, as a result of any refined additions will drive the viewer’s eye proper to that point of interest. We will flip highlights into designed shapes to tie every part collectively. At this level, be sure that the lighting is punchy however with out combating the unique lighting of the pencil sketch. The tattooed flower outlines in my piece weren’t working, so I used an eggshell white ink brush to invert the traces and switch them into gilded jewelry. This remoted ingredient attracts refined consideration to itself.
9. Use invisible particulars for visible results
(Picture: © Eliza Ivanova)
What I name ‘invisible particulars’ unify all of the completely different layers, particularly the digital and pencil components. All through the colouring course of, periodically throw in a little bit of chromatic aberration (not more than 2-3%) in addition to blurs on sure background components and color blooms. These results break up areas that seem too excellent, which is a trait of digital artwork, into areas of color offsets and features that go out and in of focus. The aim isn’t to attract consideration to those results however to mix every part collectively. Solely do these on color and element layers and don’t contact the pencil sketch. Above, you’ll be able to see how the color aberration appears within the colouring of the eyes, which have a blue/yellow tint.
10. Refine the background components
(Picture: © Eliza Ivanova)
Subsequent, I refined the background leaves. I went with ginkgo leaves, as a result of their form is so recognisable, whilst silhouettes. The aim is to ensure that, because the leaves are being refined, they don’t overpower the main points of the determine. To keep away from that, I made certain the road work of the leaves is nearer in worth to their base yellow. The define is nearer to the inverted define of the flower tattoos, however doesn’t have the identical inverted impact, because the leaves’ define is mixed into the color layer.
11. Contact up the tones
(Picture: © Eliza Ivanova)
Generally altering pure white or pure black components to completely different shades with cool or heat undertones can add sophistication to the general look – a giant distinction with a seemingly minor adjustment. In my picture, I modified the tone to a darkish magenta that paired properly with the blue tone of the pencil sketch. I additionally added a magenta color that bleeds onto the arms and fingers, in addition to a few of the ginkgo leaves, to additional unify the varied layers.
12. Deal with any suggestions
(Picture: © Eliza Ivanova)
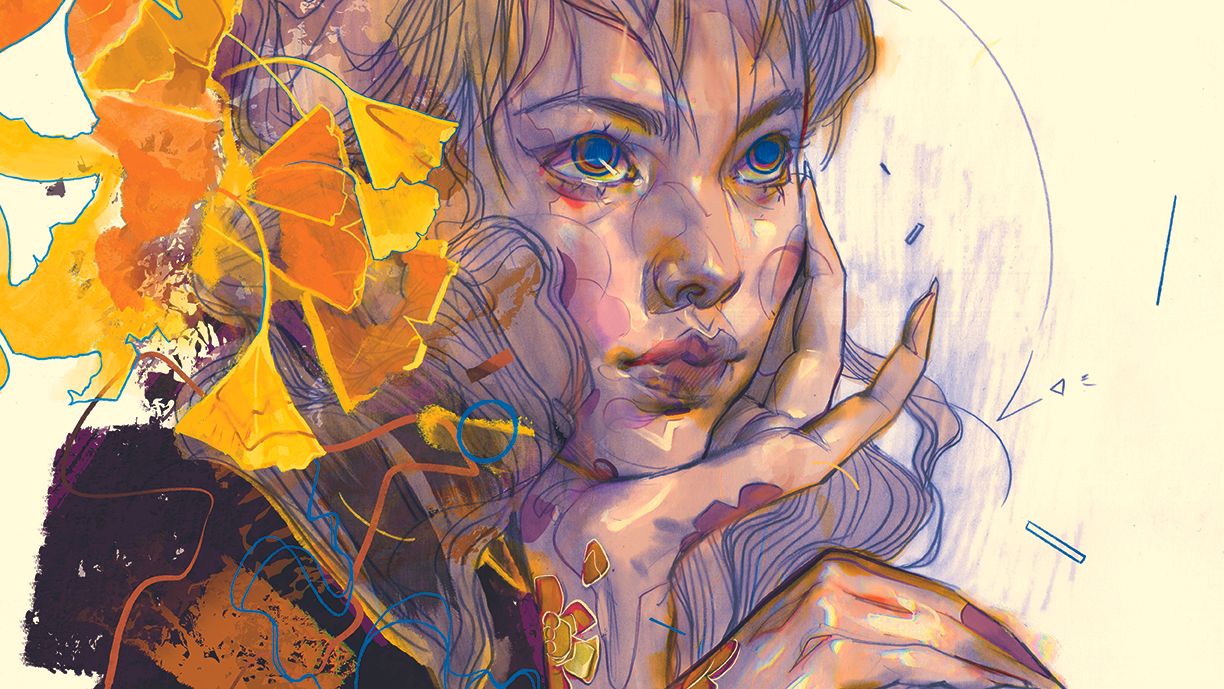
Within the remaining photos, I needed to push the colors and additional enhance the blues and yellows. I added some extra chromatic aberration to the highlights this time, as I felt they have been trying barely underbaked in comparison with the remainder of the picture. This had the bonus of including a magical, technicolour impact that felt nostalgic. Lastly, I created some blue ginkgo leaf outlines as design components to fill a few of the cleared area. The blue tones have been requested, which is why I added them all through. Each bit has its calls for for colouring, and a few require a heavier digital move than others. With that mentioned, my normal setup is just about similar to this one, and it’s a matter of how a lot or how little I lean into colouring and boosting the unique. The one time my course of can barely differ is after I create a digital sketch from scratch, although even then, the layer setup largely finally ends up being near this one.
This content material initially appeared in ImagineFX journal, the world’s main digital artwork and fantasy artwork journal. ImagineFX is on sale within the UK, Europe, United States, Canada, Australia and extra. Restricted numbers of ImagineFX print editions can be found for supply from our on-line retailer (the transport prices are included in all costs).Day by day design information, critiques, how-tos and extra, as picked by the editors.