

On this tutorial, I need to share a sensible method to find out how to paint on a Samsung Galaxy pill. I prefer to suppose my work is supported by digital instruments, not pushed by them. Whereas I’m utilizing the Sketchbook Android app, the main focus of this tutorial will not be on the software program itself however on the way it can adapt to the way in which you draw. Which means it must be equally relevant to any of one of the best drawing apps for Android or one of the best digital artwork software program usually.This methodology blends a few of the methods I’ve developed in my very own workflow, together with diversifications for the distinctive quirks and limitations of engaged on a cell gadget – on this case, a Samsung Galaxy gadget with a pressure-sensitive S Pen.Due to the precision of styluses and the responsive really feel of at present’s drawing apps, sketching on a pill can come surprisingly near the expertise of drawing in Photoshop on a drawing pill. And whereas Sketchbook doesn’t have each superior characteristic, it affords an intuitive and strong set of instruments that make it an amazing cell sketching companion (additionally see o
Chances are you’ll like
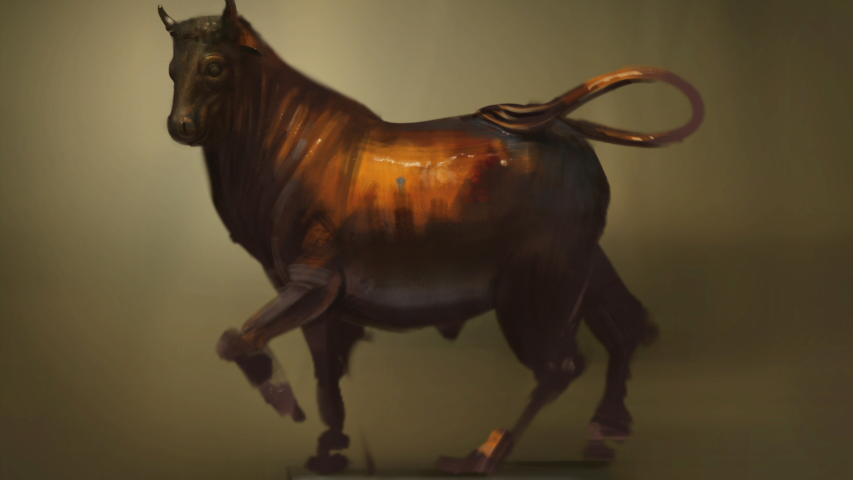
For this research, I needed to discover a topic that will permit for an extended, extra observational sketch – one thing wealthy in kind and color, and ideally in a heat and comfy setting.On the V&A Museum, there is a fantastically curated sculpture part, and proper in entrance of a very inviting couch sits a bronze-lacquered sculpture of a bull. It’s the proper mixture of element, drama and rest. I settle in, stylus in hand, and start the sketch.
01. Placing down an preliminary structure
I start by filling the canvas with the common color of the background and blocking in a picture of the bull on a layer above. As soon as I’m proud of the silhouette I lock the layer in order that I’m then solely portray inside the silhouette. Then, as a way to add the plinth below the bull I take advantage of the Straight Line device which lets you set an angle after which each stroke you draw is at that very same angle (identical to a ruler).
02. Blocking within the large shapes
Now, persevering with to work inside the silhouette, I begin to add free strokes to each the bull and the background. I do numerous squinting at this stage to allow my eyes to lose the finer element and focus as an alternative on the larger types and hues. I discover that retaining the comb strokes large and approximating the types quite than getting misplaced intimately at this level actually helps me maintain a cohesive picture later.
03: Attempting totally different brush settings
I mess around slightly with the comb settings and differ the comb dimension parameters. I discover that is one thing that may be a very nice benefit with the Samsung Word attributable to its stress sensitivity, in contrast to the iPad’s capacitive stylus enter. It’s good to have these customisable brushes out there in SketchBook Professional, nevertheless I discover for probably the most half I are likely to maintain to only one or two brushes.
04: Beginning to add element
At this level I’ve roughed in numerous free info, and now I begin including particulars. I get so much tighter with the placements of folds, shadows and highlights however nonetheless retaining my brush strokes as giant as doable. I generally create new layers and merge them down after I’m proud of them, erasing areas that don’t work earlier than I do, and I zoom out and in of the picture, one thing that’s intuitive with the pinch motion that’s so frequent now with contact screens.
05: Transferring issues round
I resolve that the attention is within the improper place and so as an alternative of re-drawing it, I resolve to rescale it. Now this isn’t so simple as it will be in Photoshop, however is definitely fairly straightforward. I duplicate the bull layer after which erase all however the eye, I can then use the Remodel device to scale and transfer the attention into its new place, and merge down the layer as soon as I’ve completed this.
06: Photoshop Contact
I don’t just like the strokes on the background, so I’ve a play with that. I take the background into Photoshop Contact, which I don’t like for portray, however which does have a greater array of modifying instruments and use the Gaussian blur and Gradient instruments to regulate the background and provides extra focus to the bull’s head, which is my predominant space of focus.
07. Including focus
I then take the picture again into SketchBook Professional, and maintain the layer small so I can apply a lighter space across the head of the bull with the Airbrush. There’s a restrict to the utmost dimension the Airbrush will go so retaining the layer small permits me to make a easy gradient. I then scale the background up and erase the plinth space in order that it’s nonetheless crisp. I really feel that this one little bit of inventive licence I take advantage of actually helps the picture.
08. Getting tighter
I proceed including particulars, making an attempt to get the hues and saturation of my colors as shut as doable. One of many fascinating issues I discovered was that in amongst the very saturate highlights and shadows there have been areas of complete desaturation. I actually like how these remoted areas play in opposition to the saturated oranges and reds (within the space the place the tail meets the again for instance).
09. The pinnacle
I’m proud of the final course now, however really feel that the top wants numerous work so I resolve to refine it. I take advantage of the Circle device, which has similarities to the Line device I used earlier (this one is like having a compass). It means that you can outline the centre level and form (oval to round) and you may then paint or erase to that very same form. I feel it is a useful gizmo, and use it to round-off the attention with the eraser.
10: Detailing
I’ve bought to the purpose the place I can’t see sufficient element the place I’m sitting (I’m round a metre and a half away) so I get one of many stools the V&A offers and sit as near the sculpture as doable. Shut up it’s so much simpler to refine the small print of the face. I can see the textures I couldn’t see from additional away, in addition to the refined saturation shifts that happen even inside the saturated orange areas.
11. Ending touches
After slightly extra tweaking, bumping up a few of the highlights, with closing time approaching I name it completed. I like the truth that the legs are fairly tough and the top is so much tighter, I usually get sucked into rendering all the pieces in a picture, however that’s one thing I’m making an attempt to maneuver away from so this was a great way to try this. I’m pretty proud of this research and hope to exit and do extra prefer it quickly.
See under for Samsung Galaxy Tab costs. For extra suggestions, see our items on digital plein air portray and on doing life drawing on an iPadToday’s greatest Samsung Galaxy Tab dealsDo you’ve got a digital artwork tip or piece of recommendation for portray on a pill? Share your recommendation within the feedback under.