

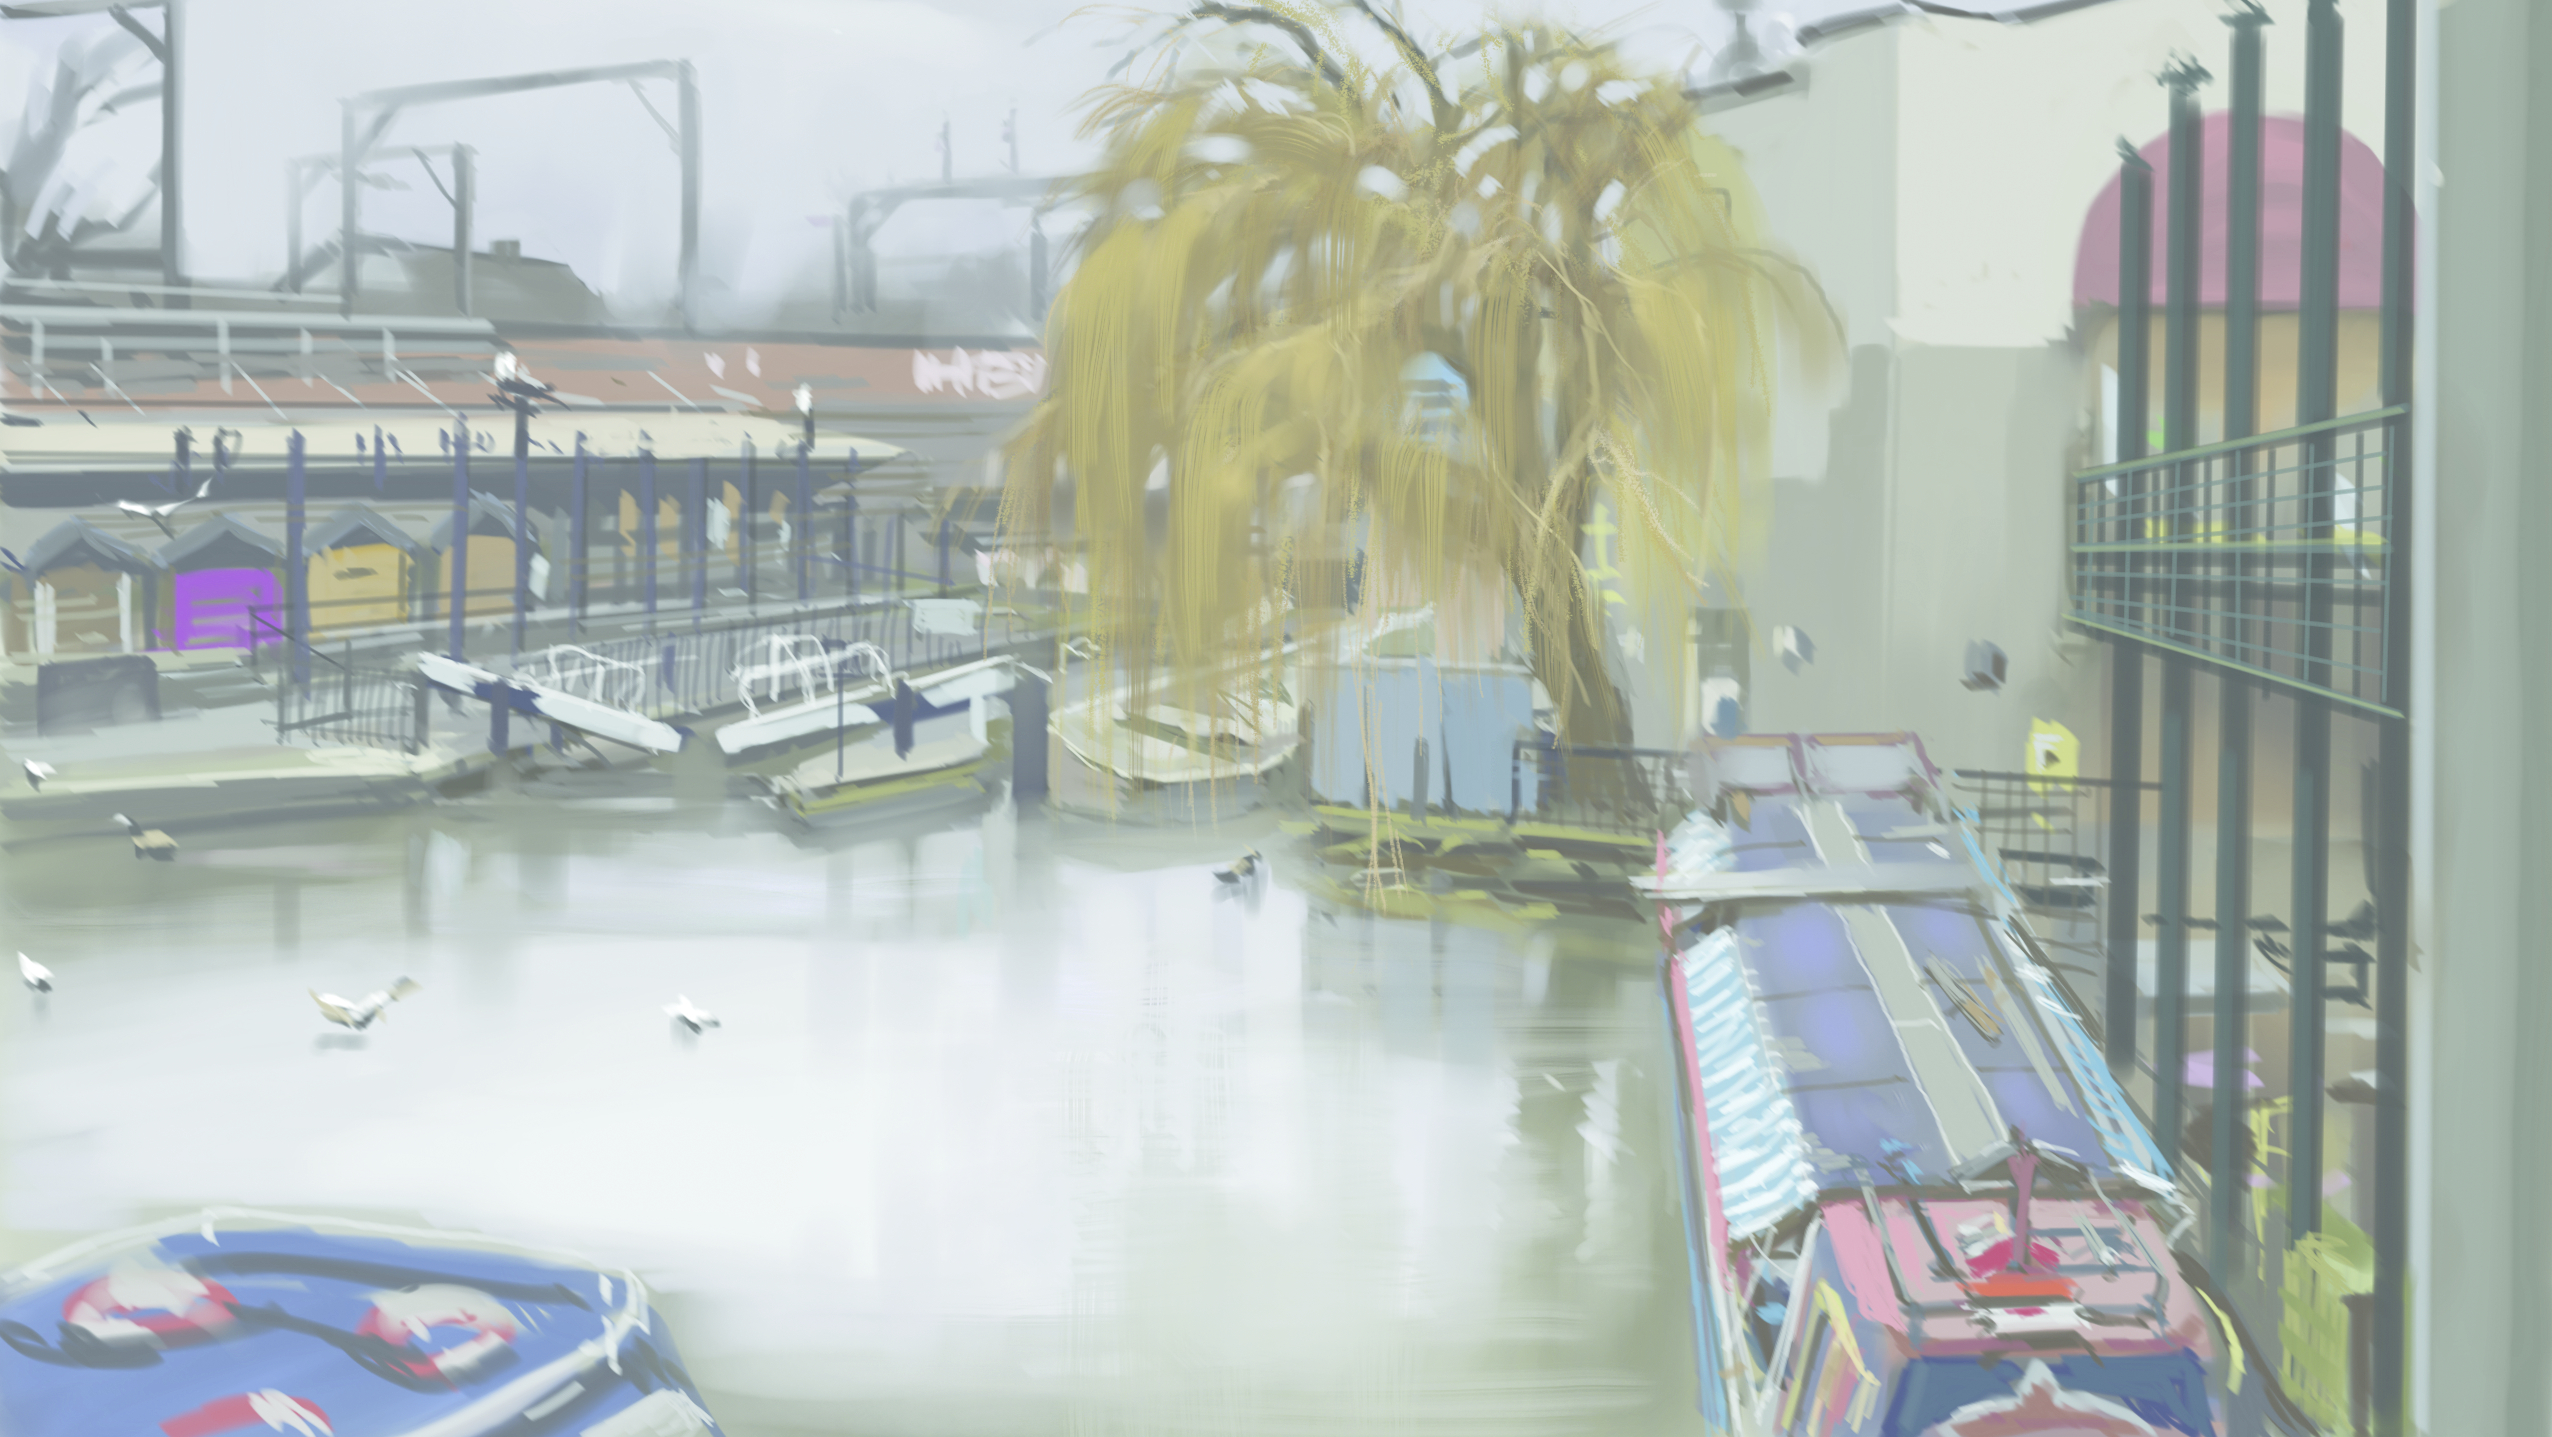
Dwelling in London is a continuing supply of inspiration – its gorgeous structure and wealthy historical past supply infinite materials for portray. However for this workshop on paint an city scene, I’ve chosen to concentrate on one thing extra common: a well-known, on a regular basis city scene that could possibly be present in virtually any fashionable metropolis.There’s a sure poetic appeal in washed-out, neglected corners – locations that may appear mundane at first look, but maintain their very own quiet magnificence. Utilizing my Samsung pill as a transportable digital portray package, I take each likelihood I get to go outdoors and paint from life, capturing these fleeting city moments as they unfold.For this workshop, I am utilizing the Android app Sketchbook on a Samsung Galaxy Tab, however you possibly can use any of the most effective drawing apps for Android or the most effective digital artwork software program, and you possibly can additionally use an iPad or among the best drawing tablets.
You might like
01. Establishing
The primary tip I can provide for anybody desiring to do city sketching is to be sure to are usually not placing your self in hurt’s means by choosing places which might probably be harmful, similar to railways, unmarked roads, or dodgy areas the place you possibly can get mugged due to your pill. Discover a secure spot the place you possibly can spend a number of hours comfortably. Espresso outlets supply nice views by way of the window, they’re heat they usually have… properly, loads of espresso. Additionally strive your native museums – they’ve nice lighting circumstances
02. Lay-in
I fireplace up Sketchbook. That is essentially the most intuitive and straightforward to make use of software program I’ve encountered. Going through a real-life atmosphere might be overwhelming, so I determine to select a bit from my visual view that will make an attention-grabbing composition.Then, I take a second to look at. It’s inconceivable to course of all the small print without delay so I’ve to simplify the scene and group objects into giant lots. I shortly lay in some very tough marks defining my composition.
03: Instruments
For fast sketching and strong marks, I take advantage of the Marker brush, and for many of this workshop, I take advantage of the Oil brush. The Marker is simply wonderful for sketching whereas the Oil brush actually does a terrific job of making creamy strokes which I really like a lot. In reality, I choose it to some other digital brush in any out there software program available on the market. Subsequent, I modify the color mode to RGB, primarily as a result of I’m extra used to it.
04: Color basis
Usually, I might paint straight on high of my traces however since I’m going through a quite difficult palette, I create a brand new layer and set it to Multiply. That means I permit myself extra room to make errors and to repair them, with out dropping the primary composition. I observe rigorously once more. I would like to seek out colors that dominate the scene. This step will affect all the pieces I do afterwards, so I take my time. It’s all about trial and error at this level. Actual life colors are fairly difficult to get so once more, I simplify them into those that appear most distinguished.
05: Overcast
I picked a day with gray sky which we outline as overcast mild. There are not any spectacular brilliant colors or darkish solid shadows, which makes the scene look a bit flat. However there’s one big benefit when portray overcast from life: it stays the identical! Anybody who ever painted from life will know the way irritating it may be to have mild altering in a matter of minutes. On an overcast day, the sunshine stays largely the identical for almost all of the day. Additionally in overcast, you can find a large amount of native colors, unaffected by robust daylight. I begin placing a number of completely different colors down however I maintain them inside the same worth vary. I add a Regular layer on high of the Multiply one and paint in a Regular layering mode.
06: Color matching
Plenty of instances, artists stylise and improve real-life colors in an effort to enhance the dramatic affect on the viewer. Different instances, it’s about attempting to seize the second as it’s. I’m taking the latter strategy which requires a number of exploration. I continually paint stroke on high of stroke, whereas attempting to precisely match the colors I see in entrance of me. Avoiding Undo will create a really good phantasm of underpainting and can present richness to the ultimate piece.
07. Binding colors
The cloudy sky impacts all the pieces I see, so I spend a while matching its color and worth. It seems being a bit on the cool aspect, so I ‘settle down’ the remainder of the canvas, significantly within the brighter areas. Placing gray subsequent to heat colors creates an phantasm of a bluish tone, simply as gray subsequent to chill colors makes it seem heat. Color relativity can play video games together with your thoughts generally, so it’s a good suggestion to strive all of your choices.
08. Lining up
In Sketchbook, there’s a device that may be of nice assist if you find yourself portray city environments. Open your Software Choice menu and choose the Line device. Each line you make shall be straight and can go in any path you need. There’s a group of pillars on the precise hand aspect and I would like them straight. Since my traces look as if drawn by a baboon on espresso, I take advantage of my Line device to get these pillars lined up properly.
09. Including darkish accents
The portray feels too flat as a result of I don’t have the correct vary of values. Once more, I have to look precisely the place to seek out darkest spots and likewise, what color they’re. I would like to wash up the realm behind the pillars as a result of I noticed some heat tones in there. Subsequent, I point out some structural particulars on the boat to the precise, realising that it’s fairly an essential compositional ingredient within the image. I nonetheless ignore the tree and paint the realm behind it. The tree shall be a payoff since I discover it simpler to color than all these different issues I see.
10: Defining components
Combining my Marker and Oil brushes, I begin defining components within the image. The canal lock provides an attention-grabbing distinction in values and the water shows good reflections, so I ensure that to seize all that. The little outlets on the left and the boats supply a number of completely different native colors and I begin placing these down. Who would know that there are such a lot of colors on such a gray winter’s day.
11. Blocking within the tree
I would like to have the ability to get a touch of the realm behind the tree high so firstly, I outline its trunk. This provides me a powerful base on high of which to color. Nevertheless tempting the thought of zooming in appears, I don’t permit myself to do this. I group the branches into lots with daring brush strokes. They fluctuate in worth and color so I take note of protecting in step with actuality. I would like a base first which I can element a bit extra within the subsequent step.
12. Branching out
Time to place extra data within the tree. From my brush choice menu, I choose this leafy brush which ought to give me the precise kind of texture. I usually choose brushes that go away marks just like the article I intend to color. Following the rhythm of the branches, I draw some highlighted sections and nonetheless resist zooming in. And really quickly, I begin realising that it’s not figuring out.
13. Time to simplify
The tree is a multitude and is disturbing the stability of element throughout the portray. It’s essential to have a very good economic system of element as an excessive amount of can destroy a bit. So it’s time to simplify issues. I open up my brush choice menu and choose this streaky brush that leaves marks which point out the path of the stroke and with that, the path of the shape.
14. Smoothing issues out
I begin by grouping tree branches and easily indicating element, quite than portray it out. It really works significantly better and, with the comb I picked, I paint the hanging branches with no effort in any respect. Motivated by this little success, I place horizontal strokes throughout the water floor with the identical brush. It takes just some brush strokes to attain the impact of water ripples. I’m going again to my Oil brush and paint some unfavourable area into the tree, which provides the picture a direct depth. Subsequent I push again the distant background as a result of it appeared in some way too shut. In actuality, the distant homes and phone poles are a lot darker. That is the place I took the freedom of stylising the scene for the sake of readability.
15. Geese and seagulls
There’s a flock of seagulls and some Canadian geese flying out and in, searching, combating and customarily making a number of noise. Visible noise, that’s. So I determine to color them in. I seize my Marker brush and I attempt to seize the essence of the birds by placing down simply a few marks for each. They put issues in actuality as a result of we now have seen such scenes so many instances in our lives that our mind will instantly agree with it. As a lot as I’d wish to maintain engaged on this piece, it’s time to maneuver on. I’ve obtained loads of murky overcast days forward.
For extra tips about portray on Android, see our piece on paint from life on a Samsung Galaxy pill. See beneath for Samsung Galaxy Tab costs.Do you have got a tip for digital portray on a pill? Share your recommendation within the feedback part beneath.As we speak’s greatest Samsung Galaxy Tab offers